
How to Label Furniture Parts and Screws After Disassembly
Taking furniture apart before a move can make large items easier to handle and transport. However, the job does not end when the panels are separated. Once screws, bolts, brackets and wooden components are scattered across the room, it can become difficult to remember which pieces belong together.
Discuss Your Moving Requirements →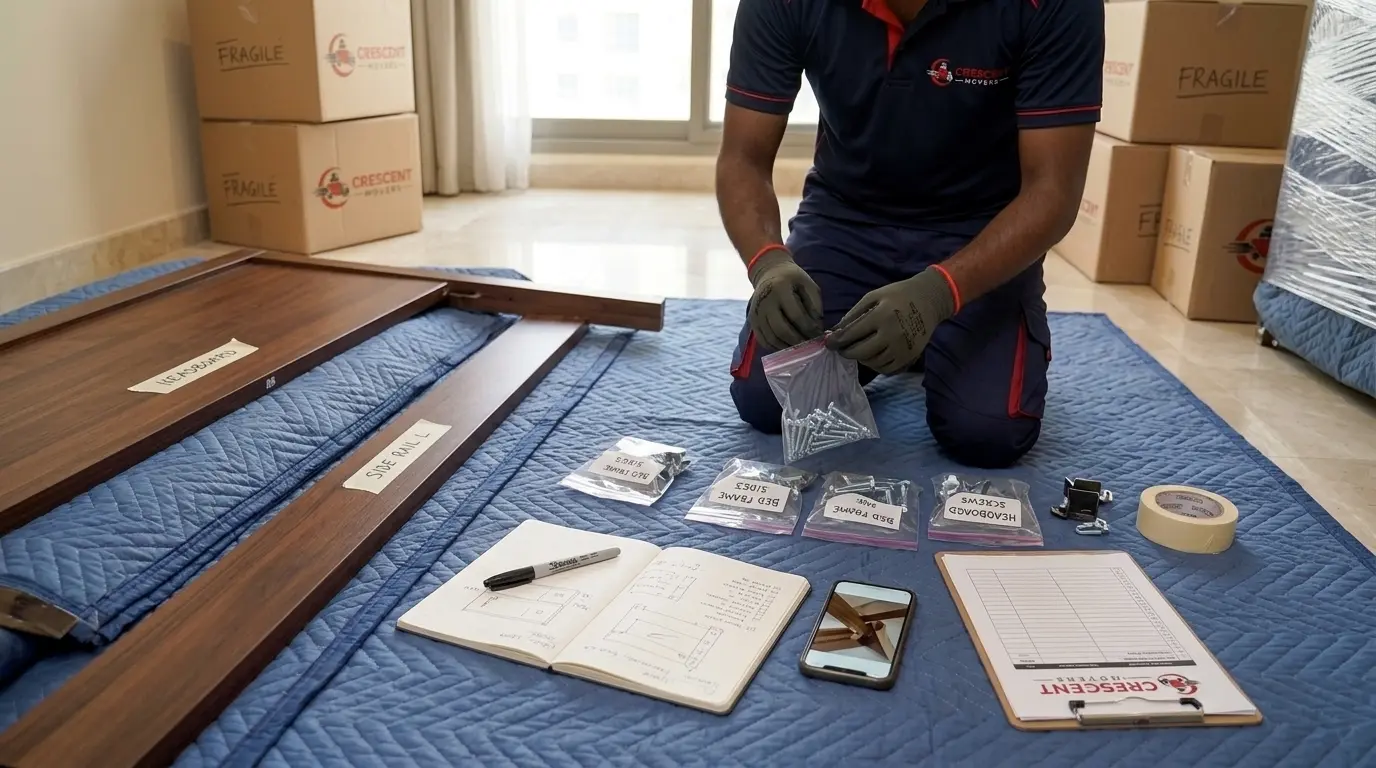
A bed may have several similar-looking bolts, a wardrobe can contain dozens of fittings, and a desk may have multiple panels that appear almost identical. If the hardware gets mixed up or the parts are not identified properly, putting everything back together can take much longer than expected.
The simplest solution is to create a clear labelling system before and during disassembly. By photographing each item, assigning it a code, labelling its components and keeping the hardware together, you can make furniture reassembly more organized at your new home.
This guide explains how to label furniture parts after disassembly, protect small fittings and prepare everything for transportation.
Why Should You Label Furniture Parts Before Moving?
Labelling helps you identify individual components without relying on memory. It is especially useful when several pieces of furniture are dismantled at the same time or when different items use similar screws and brackets.
A simple system can help you:
- Identify which screws belong to each furniture item.
- Distinguish similar panels, shelves and support pieces.
- Follow the correct assembly sequence.
- Reduce the risk of losing small fittings.
- Avoid unnecessary trial and error during reassembly.
- Keep furniture components organized during loading and unloading.
For example, if you dismantle a bed, wardrobe and study desk in one day, placing all the screws in a single container can create confusion. Separate, labelled bags make it easier to identify the correct hardware when each item needs to be assembled again.
What Supplies Do You Need for Labelling Furniture Parts?
Prepare your labelling supplies before removing any screws or fittings. Keeping everything within reach helps you label components immediately rather than trying to identify them later.
Useful supplies include:
- Small resealable bags: For screws, bolts, nuts, washers and brackets.
- Masking tape or removable labels: For identifying panels without leaving permanent marks.
- Permanent marker: For writing short, readable codes on bags and labels.
- Phone or camera: For photographing furniture and its connections before dismantling.
- Notebook or digital notes app: For recording assembly order and unusual fittings.
- Small containers: For holding grouped hardware bags during transportation.
- Soft protective material: For separating delicate or finished furniture panels.
Choose labels that are suitable for the surface. Test adhesive labels on an inconspicuous area first, particularly on polished wood, laminate, painted surfaces or delicate finishes. When in doubt, label a protective bag or attach a tag instead of sticking anything directly onto the furniture.
Step 1: Photograph the Furniture Before Disassembly
Before loosening any screws, take clear photographs of the assembled furniture from several angles. These images provide a visual reference when you need to understand how the components fit together.
Capture:
- The complete furniture item from the front.
- The back and sides, where accessible.
- The inside of drawers, cupboards or storage compartments.
- Brackets, hinges, runners and support connections.
- The position and orientation of unusual panels.
- Any adjustable feet or components that need a particular arrangement.
Take additional close-up photographs of complicated joints before removing their fasteners. A wide photograph may show the overall design, but a close-up can reveal the exact position of a bracket or the direction in which a panel fits.
Save the photographs in a dedicated folder on your phone. Name each image with the furniture code, such as BED01-before or WARD01-hinges, so it is easy to find later.
Step 2: Give Every Furniture Item a Unique Code
Create a simple code for each item before taking it apart. Keep the code short enough to write on a label and easy enough to understand without referring to a complicated system.
For example:
| Furniture item | Suggested code |
|---|---|
| Main bedroom bed | BED01 |
| Bedroom wardrobe | WARD01 |
| Study desk | DESK01 |
| Dining table | TABLE01 |
| Living room shelving unit | SHELF01 |
If you have two similar beds or desks, assign each a different number. Do not give separate items the same code simply because they look alike.
Write the code on your inventory list and use it consistently on the component labels, hardware bags and photographs.
For example, all components belonging to the first bed should begin with BED01. This creates a clear connection between the furniture item and its individual parts.
Step 3: Label Panels and Components as You Remove Them
As each component is removed, identify it immediately. Do not wait until the entire item has been dismantled, because similar-looking pieces may become difficult to distinguish.
A useful label includes three details:
- Furniture code: Which item does the part belong to?
- Part name: What is the component?
- Orientation or position: Where does it fit?
For example:
BED01 — LEFT SIDE RAIL
BED01 — HEADBOARD
WARD01 — TOP PANEL
WARD01 — LEFT DOOR
DESK01 — REAR SUPPORT
For components that are almost identical, add a position marker such as left, right, front, rear, upper or lower. If a panel has a specific orientation, photograph it and record that detail in your notes.
How Should You Attach Labels Safely?
Use removable tape on a suitable, inconspicuous surface, or attach a tag through an existing handle or safe opening. Avoid putting adhesive on delicate finishes, exposed veneer edges or surfaces where residue could remain.
For small components, a label on the bag is often better than a label on the part itself. For large panels, a removable tag can be useful if it stays attached throughout handling.
Do not write directly on finished furniture unless the manufacturer permits it and the marking method is safe for that material.
Step 4: Organize Screws, Bolts and Other Hardware
Small hardware is easy to misplace because screws, washers and fittings can look very similar. The safest approach is to group hardware according to the furniture item and the connection from which it was removed.
Use one resealable bag for each logical group of fasteners. For example:
BED01 — HEADBOARD BOLTS
BED01 — SIDE RAIL SCREWS
WARD01 — HINGE SCREWS
DESK01 — LEG FIXINGS
If a connection contains several different pieces, keep them together where practical. You can also photograph the hardware before removing it to document the order in which washers, spacers or brackets were fitted.
Avoid mixing every screw into one large bag. Even if the screws look similar, their length, thread or head type may differ. Using the wrong fastener during reassembly can damage a panel or create an insecure connection.
For extra protection, place the labelled bags for one item inside a larger container assigned to that same item. This gives you two levels of organization: the furniture code on the outer container and the specific component label on each small bag.
Step 5: Keep Each Hardware Bag With Its Furniture
Once the hardware is labelled, make sure it stays with the correct furniture item throughout packing, loading, transportation and unloading.
A practical method is to place the smaller hardware bags in a larger resealable bag or secure container marked with the furniture code. Keep that container with the corresponding furniture components rather than in a general toolbox used for the entire move.
For example, the container marked BED01 should hold the bed's labelled fastener bags and relevant assembly notes. The wardrobe's hardware should remain separate.
If several pieces of furniture are being transported together, keep the hardware containers in one designated, secure location where they will not be crushed, lost or accidentally discarded. Record where that location is on your inventory list.
Step 6: Record the Disassembly Sequence
Some furniture can be reassembled by following the manufacturer's instructions, but other items have complicated connections or components that fit in a particular order. A short written record can help you remember the sequence.
Your notes might include:
- Which component was removed first.
- Which fittings connect the main panels.
- Whether a bracket faces inward or outward.
- Which drawer or shelf belongs in a particular position.
- Any adjustments made before disassembly.
- Where the manufacturer's assembly instructions are stored.
Keep the notes brief and specific. For example: “Remove the two upper brackets before lifting the desk top” is more useful than writing “Take apart desk.”
If you have the original instruction manual, keep it with the relevant furniture code. If the manual is available digitally, save a copy in the same folder as your photographs.
Never force a component into place during reassembly simply because the notes suggest it should fit. Check the photographs, hardware and manufacturer's instructions first.
Special Labelling Tips for Beds, Wardrobes and Desks
Different furniture items need slightly different approaches.
Beds and Bed Frames
Label the headboard, footboard, side rails, centre supports and slats individually. If the left and right rails look similar, mark their orientation clearly.
Keep the relevant bolts and brackets in separate bags if they connect different sections of the frame. Record the placement of support legs and any adjustable fittings.
Wardrobes and Cabinets
Wardrobes often contain doors, shelves, hinges, drawer runners and backing panels. Identify each door by its position and each shelf by its location.
For example, WARD01 — LEFT DOOR and WARD01 — UPPER SHELF are more helpful than simply writing “door” or “shelf.”
Protect mirror panels, glass inserts and finished doors separately. Labels should not damage delicate surfaces, and small hardware should never be left loose against glass or polished panels.
Desks and Dining Tables
Label the top, legs, crossbars and support brackets. For desks with drawers or cable-management fittings, photograph the connections before removing them.
If a table has several similar legs, use position labels where their placement matters. Keep any extension-leaf fittings with the table's other hardware and note how the leaves were installed.
Common Furniture Labelling Mistakes to Avoid
A labelling system only works if the information remains clear and attached to the correct item. Watch out for these common mistakes.
Labelling Everything Too Late
Once all the pieces are separated, it may be difficult to remember their original positions. Label components as they are removed.
Using Vague Names
“Panel 1” may not help unless you also identify the furniture item and the panel's location. Use descriptive names and consistent codes.
Mixing Different Fasteners
Similar-looking screws can have different lengths or threads. Keep them grouped by connection wherever possible.
Using Unsafe Adhesive
Strong tape or permanent markers may damage a furniture finish. Use removable labels or tags appropriate for the material.
Relying Only on Photographs
Pictures are useful, but they do not always identify every screw or show the exact assembly sequence. Combine photographs with labels and short notes.
Discarding Packaging or Instructions Too Early
Keep original hardware packets, instruction manuals and any relevant diagrams until the furniture has been reassembled and checked.
Leaving Bags Unsecured
A correctly labelled bag is of little use if it gets lost during transportation. Keep each hardware group inside a secure container and record its location.
Final Checklist Before Transportation
Before the dismantled furniture leaves your home, take a few minutes to verify the labelling system.
- Every furniture item has a unique code.
- Main components are labelled with clear names.
- Left, right, front and rear orientations are recorded where needed.
- Screws, bolts, washers and brackets are separated appropriately.
- Hardware bags are labelled and securely closed.
- Each hardware container is assigned to the correct furniture item.
- Reference photographs are saved and easy to locate.
- Assembly notes and instruction manuals are kept safely.
- Labels and tags will not damage furniture finishes.
- Small components are secured against loss during transportation.
If anything is unclear, resolve it before loading. A few minutes spent checking labels can prevent unnecessary searching and confusion when you reach your new home.
Conclusion
Knowing how to label furniture parts after disassembly can make the reassembly process much more straightforward. Assign each item a unique code, photograph complicated connections, identify every important component and keep screws and fittings grouped in clearly labelled bags.
The goal is not to create an elaborate inventory system. It is to make sure every part can be identified and returned to the correct place without relying on memory.
For a larger move involving several beds, wardrobes, desks or cabinets, organize the furniture one item at a time and complete its labelling before moving on to the next. If you need help planning the handling and transportation of dismantled furniture, you can contact Crescent Movers to discuss your relocation requirements.
Frequently Asked Questions
1. How do I label furniture parts after disassembly?
Assign each furniture item a unique code, label every major component with its name and position, and use the same code on its hardware bags and reference photographs.
2. What is the best way to organize furniture screws?
Place screws, bolts, washers and brackets into separate resealable bags grouped by furniture item or connection. Label each bag clearly and keep it in a secure container.
3. Should I label furniture panels directly?
Only if the labelling method is safe for the surface. Test removable tape first, or use tags and labelled protective bags to avoid adhesive residue or marks.
4. How can I tell similar furniture panels apart?
Use position labels such as left, right, upper, lower, front and rear. Take photographs before removing each panel, especially when the parts look almost identical.
5. How do I stop screws from getting lost during a move?
Seal each labelled hardware bag, place it inside a secure container and assign that container to the corresponding furniture item. Keep the container in a designated location throughout the move.
6. Should I take photographs before dismantling furniture?
Yes. Photograph the assembled item, complicated connections and the position of brackets or fittings. These images can help you understand how the components fit together later.
7. Should all furniture screws go into one bag?
No. Different connections may use screws of different lengths, threads or types. Keep fasteners separated by furniture item and, when useful, by connection.
8. What should I do if I cannot identify a furniture part?
Check your photographs, assembly notes and manufacturer's instructions. Avoid forcing the part into a connection or substituting a fastener until you have confirmed the correct arrangement.
Planning Your Next Furniture Move?
For furniture handling and transportation requirements, speak with Crescent Movers and discuss your upcoming relocation.
Contact Crescent Movers →