
How to Label Furniture Parts and Screws After Disassembly
Taking furniture apart before a move can make large items easier to handle and transport. However, the job does not end when the panels are separated. Once screws, bolts, brackets and wooden components are scattered across the room, it can become difficult to remember which pieces belong together.
A bed may have several similar-looking bolts, a wardrobe can contain dozens of fittings, and a desk may have multiple panels that appear almost identical. If the hardware gets mixed up or the parts are not identified properly, putting everything back together can take much longer than expected.
The simplest solution is to create a clear labelling system before and during disassembly. By photographing each item, assigning it a code, labelling its components and keeping the hardware together, you can make furniture reassembly more organized at your new home.
This guide explains how to label furniture parts after disassembly, protect small fittings and prepare everything for transportation.
Why Should You Label Furniture Parts Before Moving?
Labelling helps you identify individual components without relying on memory. It is especially useful when several pieces of furniture are dismantled at the same time or when different items use similar screws and brackets.
A simple system can help you:
- Identify which screws belong to each furniture item.
- Distinguish similar panels, shelves and support pieces.
- Follow the correct assembly sequence.
- Reduce the risk of losing small fittings.
- Avoid unnecessary trial and error during reassembly.
- Keep furniture components organized during loading and unloading.
For example, if you dismantle a bed, wardrobe and study desk in one day, placing all the screws in a single container can create confusion. Separate, labelled bags make it easier to identify the correct hardware when each item needs to be assembled again.
What Supplies Do You Need for Labelling Furniture Parts?
Prepare your labelling supplies before removing any screws or fittings. Keeping everything within reach helps you label components immediately rather than trying to identify them later.
Useful supplies include:
- Small resealable bags: For screws, bolts, nuts, washers and brackets.
- Masking tape or removable labels: For identifying panels without leaving permanent marks.
- Permanent marker: For writing short, readable codes on bags and labels.
- Phone or camera: For photographing furniture and its connections before dismantling.
- Notebook or digital notes app: For recording assembly order and unusual fittings.
- Small containers: For holding grouped hardware bags during transportation.
- Soft protective material: For separating delicate or finished furniture panels.
Choose labels that are suitable for the surface. Test adhesive labels on an inconspicuous area first, particularly on polished wood, laminate, painted surfaces or delicate finishes. When in doubt, label a protective bag or attach a tag instead of sticking anything directly onto the furniture.
Step 1: Photograph the Furniture Before Disassembly
Before loosening any screws, take clear photographs of the assembled furniture from several angles. These images provide a visual reference when you need to understand how the components fit together.
Capture:
- The complete furniture item from the front.
- The back and sides, where accessible.
- The inside of drawers, cupboards or storage compartments.
- Brackets, hinges, runners and support connections.
- The position and orientation of unusual panels.
- Any adjustable feet or components that need a particular arrangement.
Take additional close-up photographs of complicated joints before removing their fasteners. A wide photograph may show the overall design, but a close-up can reveal the exact position of a bracket or the direction in which a panel fits.
Save the photographs in a dedicated folder on your phone. Name each image with the furniture code, such as BED01-before or WARD01-hinges, so it is easy to find later.
Practical tip: Take photographs as you work, not only at the beginning. A picture of each important stage can help you reconstruct the disassembly sequence if you forget where a component belongs.
Step 2: Give Every Furniture Item a Unique Code
Create a simple code for each item before taking it apart. Keep the code short enough to write on a label and easy enough to understand without referring to a complicated system.
For example:
| Furniture item | Suggested code |
|---|---|
| Main bedroom bed | BED01 |
| Bedroom wardrobe | WARD01 |
| Study desk | DESK01 |
| Dining table | TABLE01 |
| Living room shelving unit | SHELF01 |
If you have two similar beds or desks, assign each a different number. Do not give separate items the same code simply because they look alike.
Write the code on your inventory list and use it consistently on the component labels, hardware bags and photographs.
For example, all components belonging to the first bed should begin with BED01. This creates a clear connection between the furniture item and its individual parts.
Step 3: Label Panels and Components as You Remove Them
As each component is removed, identify it immediately. Do not wait until the entire item has been dismantled, because similar-looking pieces may become difficult to distinguish.
A useful label includes three details:
- Furniture code: Which item does the part belong to?
- Part name: What is the component?
- Orientation or position: Where does it fit?
For example:
BED01 — LEFT SIDE RAIL
BED01 — HEADBOARD
WARD01 — TOP PANEL
WARD01 — LEFT DOOR
DESK01 — REAR SUPPORT
For components that are almost identical, add a position marker such as left, right, front, rear, upper or lower. If a panel has a specific orientation, photograph it and record that detail in your notes.
How should you attach labels safely?
Use removable tape on a suitable, inconspicuous surface, or attach a tag through an existing handle or safe opening. Avoid putting adhesive on delicate finishes, exposed veneer edges or surfaces where residue could remain.
For small components, a label on the bag is often better than a label on the part itself. For large panels, a removable tag can be useful if it stays attached throughout handling.
Do not write directly on finished furniture unless the manufacturer's care guidance allows it.
Step 4: Keep Screws and Hardware Together
Place the screws, bolts, nuts, washers and brackets from each furniture item in a separate resealable bag. Label every bag with the furniture code and the component it belongs to.
For example, write BED01 — HEADBOARD SCREWS or DESK01 — LEG BOLTS on the relevant bag. If several types of fasteners are used, keep them separated and identify them individually.
Tape the labelled bag to a suitable, non-delicate part of the matching furniture, or keep it in a clearly labelled container with the other parts. Avoid attaching bags where they could scratch the finish or come loose during transport.
Before packing, check that each furniture item has its own hardware bag and that the labels are readable. Keep the photographs and inventory notes accessible until reassembly is complete.
How to Protect Furniture Corners and Edges During a Move
Furniture corners and edges are some of the most vulnerable areas during a move. They can chip, scratch, crack or become dented when furniture passes through narrow doorways, moves along corridors or comes into contact with other items inside a moving vehicle.
Even when the main surface is covered, exposed corners can still be damaged by a sudden impact. Wooden tables, wardrobes, cabinets, bed frames and desks all have edges that need attention during packing and transportation.
The right preparation can help reduce these risks. By inspecting furniture, choosing suitable protective materials and handling each item carefully, you can help keep your belongings in better condition throughout the move.
Why Do Furniture Corners and Edges Get Damaged?
Corners often extend beyond the main body of furniture, making them more likely to hit walls, doorframes, stair rails and neighbouring items. Edges may also experience pressure or friction when furniture is lifted, tilted or loaded into a vehicle.
Common causes of damage include:
- Accidentally hitting doorframes or walls while carrying furniture.
- Dragging furniture across floors instead of lifting it safely.
- Using insufficient padding around exposed corners.
- Allowing furniture to move during transportation.
- Stacking heavy items against delicate edges or decorative details.
- Using unsuitable tape or wrapping materials on sensitive finishes.
Understanding these risks helps you choose the right protection for each item rather than relying on a single packing material for everything.
1. Inspect Furniture Before Packing
Before wrapping furniture, check its corners, edges and joints for existing damage. Look for chipped laminate, loose veneer, cracked wood, peeling finishes, loose trim or sharp edges that may need additional protection.
Document existing damage with photographs. This gives you a useful record of the furniture's condition before transportation and helps you identify areas that need extra care.
Remove loose accessories and check whether any parts should be dismantled before wrapping. If a component is already unstable, address it appropriately before attempting to move the item.
Pay particular attention to furniture with glass inserts, mirrors or decorative trim. These areas may need specialized protection beyond standard corner guards.
2. Choose Suitable Corner Protection Materials
Different furniture types need different levels of protection. Choose materials based on the item's weight, finish, shape and the risks involved in handling it.
Foam corner guards
Foam corner guards provide cushioning around exposed corners and can help reduce the impact of minor knocks. Select a size that fits securely without putting excessive pressure on the furniture.
Cardboard edge protectors
Sturdy cardboard protectors can cover straight edges and corners. They are useful for creating a protective barrier between furniture and nearby objects during handling and transportation.
Moving blankets
Moving blankets help protect larger surfaces from scratches, scuffs and friction. Wrap them securely around the furniture, paying attention to exposed corners that may need additional padding underneath.
Bubble wrap
Bubble wrap can provide extra cushioning for suitable items and smaller components. Use it as part of an appropriate protective system rather than assuming it will prevent all damage from heavy impacts.
Stretch wrap
Stretch wrap can help hold blankets and protective layers in place. Avoid applying it directly to delicate or sensitive finishes where it may cause marks, residue or other problems. Use a suitable protective layer and follow the furniture manufacturer's care guidance.
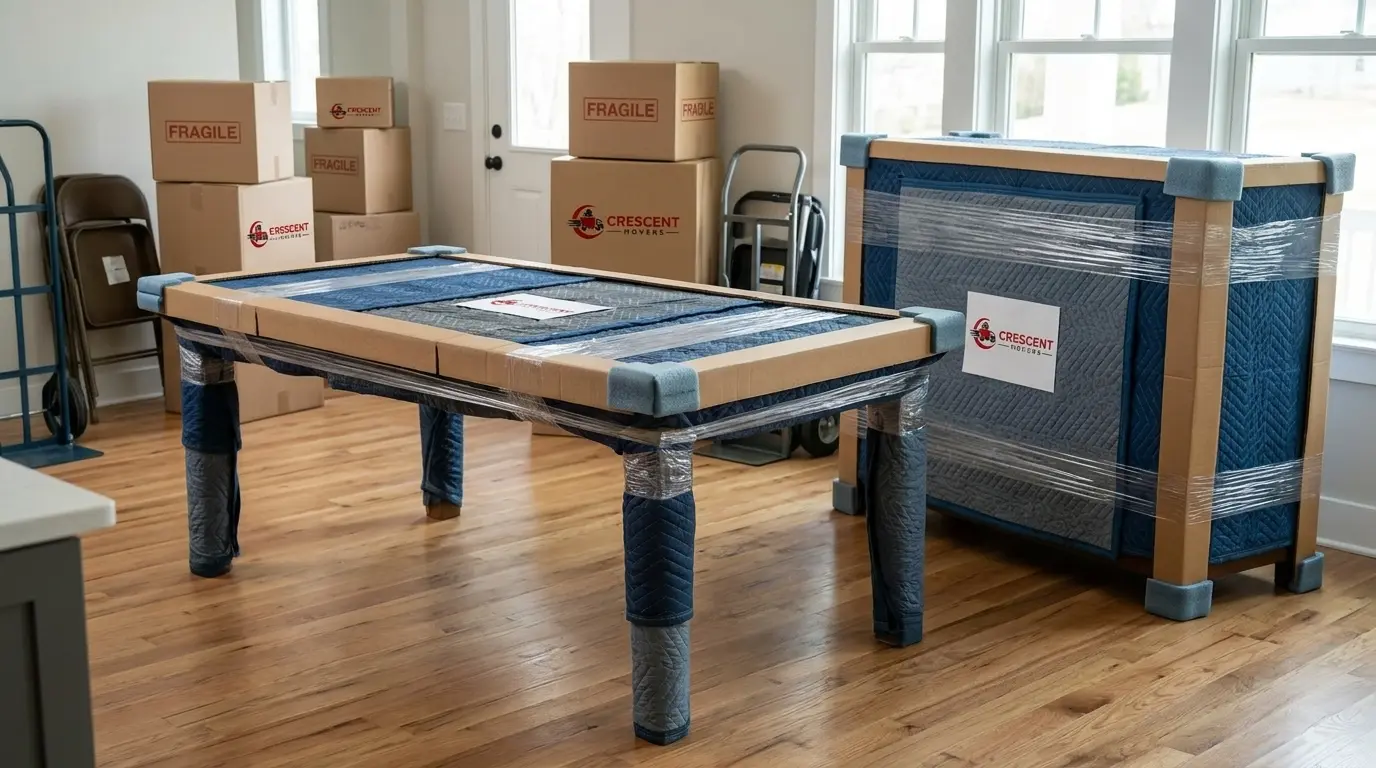
3. Protect Table and Desk Corners
Dining tables, coffee tables and desks are often vulnerable because their corners extend beyond the main frame. They can strike doorframes or nearby objects when the furniture is turned.
Follow these precautions:
- Remove loose accessories, detachable leaves and items stored underneath the table.
- Cover the tabletop with an appropriate protective material.
- Fit corner guards to exposed corners.
- Wrap the legs separately where they could be scratched or chipped.
- Secure the protective layers without putting pressure on delicate finishes.
If the table legs can be safely removed, store the hardware separately and label the components. Do not force stuck fittings or dismantle a piece in a way that could weaken its structure.
When carrying a table, coordinate movements with the other people handling it. Check the route before turning through narrow spaces, and avoid allowing corners to strike walls or doorframes.
4. Protect Wardrobe and Cabinet Edges
Wardrobes and cabinets can have large panels, sharp corners, mirrors, decorative trim and laminated edges. Their size can make them difficult to manoeuvre, especially through apartment corridors and staircases.
Whenever practical, empty the furniture and remove shelves or detachable components according to the manufacturer's instructions. Secure doors and drawers so they cannot swing open during movement.
Protect exposed corners with suitable guards, then cover the main surfaces with moving blankets. Pay attention to the bottom corners because they may come into contact with the floor during lifting or positioning.
For cabinets with glass panels or mirrors, use protection specifically suitable for glass and make sure the item can be handled safely. Corner guards alone are not sufficient protection for fragile glass.
Avoid lifting a wardrobe by its doors, handles or decorative trim. Use appropriate lifting points and enough assistance for the item's size and weight.
5. Protect Bed Frames and Headboards
Bed frames may have exposed wooden edges, metal corners, upholstered sections or decorative headboards. Each type requires a slightly different approach.
For wooden bed frames, cover the corners and projecting joints before wrapping the rails and panels. Keep screws, bolts and brackets in labelled bags so they do not scratch the furniture or disappear during transportation.
For upholstered headboards, use a clean protective covering suitable for the fabric. Avoid wrapping too tightly, as excessive pressure may flatten padding or affect delicate details.
Metal bed frames can also scratch other belongings if their edges or fittings remain exposed. Cover projecting joints and secure loose components before loading.
If the frame must be dismantled, label the pieces and photograph the connections. This makes reassembly easier and reduces the need for unnecessary handling at the destination.
6. Prepare Furniture for Doorways and Staircases
Furniture can be damaged even when it has been packed properly if the route through the property is too narrow or difficult.
Before moving large items, measure the furniture and check the width of doorways, corridors and staircases. Consider ceiling height, tight turns, lift dimensions and any obstacles along the route.
Where necessary:
- Remove obstacles from the walking path.
- Protect vulnerable wall corners and doorframes.
- Plan how the furniture will be tilted or turned.
- Remove detachable furniture components when appropriate.
- Use enough people to handle the item's weight safely.
Do not attempt to force furniture through a narrow opening. This can damage both the furniture and the property and may cause injury. Reassess the route or seek suitable professional assistance if the item cannot be manoeuvred safely.
7. Load Furniture Without Damaging Its Edges
Protective wrapping is only one part of safe transportation. Furniture must also be positioned carefully inside the moving vehicle.
Place heavier items securely and prevent them from pressing against delicate corners, glass surfaces or decorative edges. Use suitable padding between neighbouring items where contact could cause scratches.
Keep the following principles in mind:
- Avoid placing heavy boxes on delicate furniture.
- Do not allow sharp edges to press against upholstered surfaces.
- Secure items to reduce movement during transit.
- Keep loose hardware and tools away from finished surfaces.
- Check that protective blankets have not slipped out of position.
The aim is to prevent both direct impact and repeated friction. Even small movements during transportation can damage unprotected finishes if furniture rubs against another item.
8. Common Mistakes to Avoid
Some packing methods can create new problems even when they are intended to protect furniture.
Using tape directly on finished surfaces: Adhesive can leave residue or affect delicate finishes. Secure protective material without sticking tape directly to sensitive surfaces.
Relying on thin plastic alone: Plastic may help secure a covering, but it does not provide enough cushioning against substantial impacts.
Ignoring the bottom corners: These areas can strike the floor or vehicle during lifting and placement. Protect them just as carefully as the upper corners.
Stacking furniture carelessly: Heavy items can press against weaker edges or damage decorative details. Plan the loading arrangement before securing the load.
Dragging furniture: Dragging can damage legs, lower edges and flooring. Lift and carry items using suitable techniques and assistance.
Overlooking existing damage: Loose trim or cracked corners may become worse during transportation. Inspect and address vulnerable areas before packing.
Final Checklist Before Moving
Before loading furniture, confirm that:
- Furniture corners and exposed edges have been inspected.
- Existing damage has been documented.
- Suitable corner guards or padding are in place.
- Larger surfaces are covered with appropriate protective material.
- Delicate finishes are protected from adhesive and friction.
- Doors, drawers and detachable components are secured.
- Furniture can pass safely through the planned route.
- Items are positioned and secured to prevent movement.
- Glass, mirrors and decorative details have appropriate protection.
Taking a few minutes to check these details can help prevent avoidable damage during the move.
Conclusion
Protecting furniture corners and edges during a move begins with careful inspection, suitable packing materials and safe handling. Foam guards, cardboard edge protection and moving blankets can help reduce scratches and minor impacts when selected and applied correctly.
Remember that protective wrapping cannot compensate for unsafe lifting or poor loading. Plan the route, handle furniture carefully and secure items properly inside the moving vehicle.
For additional guidance, read our article on protecting furniture during moving. If you are planning a relocation and need assistance with furniture handling and transportation, you can contact Crescent Movers to discuss your requirements.
Frequently Asked Questions
1. What is the best way to protect furniture corners during a move?
Use suitable foam corner guards or padded protection, then cover the furniture with moving blankets where appropriate. Secure the materials so they remain in place during handling and transportation.
2. Can I use cardboard to protect furniture edges?
Yes. Sturdy cardboard edge guards can help protect straight edges and corners from scratches and minor impacts. For delicate or valuable furniture, combine cardboard with suitable cushioning.
3. Should I apply stretch wrap directly to wooden furniture?
Not always. Some finishes may be sensitive to prolonged contact with plastic or adhesive residue. Use a suitable protective layer and follow the furniture manufacturer's care instructions.
4. How can I protect a dining table during transportation?
Protect the tabletop, fit guards over exposed corners, cover the legs and secure the item properly in the moving vehicle. Remove detachable components only when it is safe to do so.
5. How do I prevent wardrobe corners from getting chipped?
Use suitable corner guards and moving blankets, secure doors and drawers, and plan the route through doorways and corridors before lifting the wardrobe.
6. Are moving blankets enough to protect furniture edges?
Moving blankets help prevent scratches and scuffs, but they may not provide enough focused cushioning for exposed corners. Add appropriate corner guards where needed.
7. Should furniture be dismantled before moving?
It depends on the item's design, size, condition and the available route. Follow the manufacturer's instructions and dismantle only components that can be safely removed and reassembled.
8. How can I prevent furniture from getting scratched inside a moving truck?
Use suitable protective coverings, separate items that could rub against each other, and secure the load to reduce movement. Keep tools and loose hardware away from finished surfaces.